Fiddling Tips - #3 (Layer Masks)
Layer Masks in Photoshop - greyscale images that, when applied, make anything black in the mask image transparent so you can fill with white to give interesting edges to pics. Always got my knickers in a twist over these and could never remember how to apply them - until I realised I could do it with simple hotkeys and some familiar commands. Much easier to remember CTRL A, CTRL C, Q, CTRL V, Q (On A Mac it would be Command A, Command C, Q, Command V, Q).


1. Open the picture you want to mask and make a new raster layer on it. Minimise this pic for now.
2. Open the greyscale layer mask you want to use - lots of purty ones at www.Zuzzanna.dk which is where I got the one used here, and click image | size | Window. Look for the name of the pic you want to mask at the bottom of this 'Window' pop-up and click on it. Click okay in the size dialogue. Your mask will now be resized to fit your pic.
3. Hold down your keyboard ctrl key and hit 'A', then hold down your control key again and hit 'C'. Minimise your mask.
4. Maximise the pic you want to mask and make sure the new raster layer is active and hit the letter 'Q' on your keyboard to enter quick mask mode, then hold your ctrl key down and hit 'V'. Your mask should now appear in red over your pic. If it appears in black n white, you're not in quick mask mode so edit | undo and hit 'Q' and try again.
5. If your red mask lands where you want it to, skip this bit and go to number 6.
If you need to transform/resize your mask to fit the edges of your pic, click Edit | Free transform and use the handles to make the mask fit. Hit the Enter key when you're done then click Select | Deselect.
6. Hit 'Q' on your keyboard again to exit quick mask mode and the red mask will disappear but leave a selection behind. Choose white (or whatever colour you want) as your foreground colour and click Edit | Fill - the selection will now fill and mask the selected parts of your image. Click Select | Deselect to see how it looks. If you're happy with it, click Layers | Merge visible and save :)
Fiddling Tips - #2 (A Beginner's Guide To Fiddling)
A beginner's guide to Photoshopping fakes, originally made for my friend, Cori, zipped up for you with instructions and the images needed. It's quite detailed (7.66MB), and I only did the 'Chakotay' half of the base image, but if you'd like to see the steps needed to make a fake and maybe have a go yourself, give it a whirl.
Before :  After:
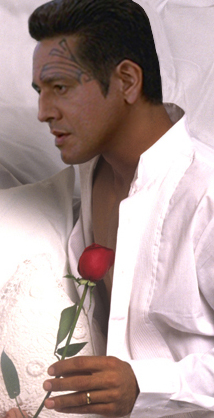
Fiddling Tips - #1 (Disguising cut-out hair)
A tip for getting rid of blunt/clumped looking hair when you want to use Janeway or Chakotay on a different background, because no matter how you cut out a head for a fiddle, you're often left with some bits of hair that LOOK cut out on another background and scream 'Fake!' before you've even started.
Before:  After :
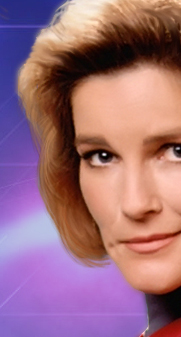
I use this trick a lot, so I thought I'd share and took screen-grabs as I went along this time. I mainly use Photoshop, but you should be able to use the basic method in most graphic programs that support brushes and layers.
First, find yourself some fine hairstrand brushes on Deviantart.com or Renderosity.com etc., There are lots of freebies around. Unzip the file if needbe, then copy the *.abr file(s) to your brushes folder. In Photoshop CS3 the path would be, C:\Program Files\Adobe\Adobe Photoshop CS3\Presets\Brushes. Remember what your brushes are called :)
Okay, so then using one of my fiddles as an example....
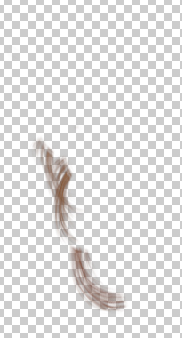
I'd cut KJ off a background and was left with some blunt, obviously cutout edges to her hair
I made a new layer, picked up a dark tone from the existing hair as my foreground colour, then went looking for a fine-strand brush in my brushes palette. I found one, clicked on it to activate it,

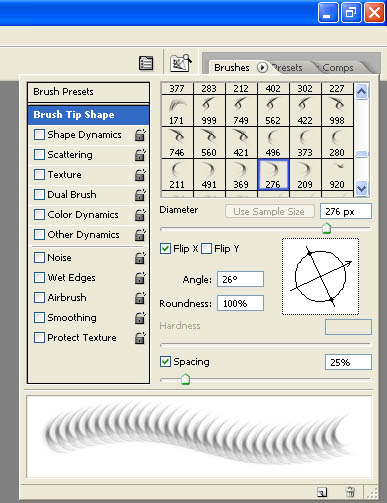
then I slid over to the top-right of my Photoshop screen and clicked on the main Brush Presets Palette and played with the angle and horizontal (X-flip) options, and the size I wanted.
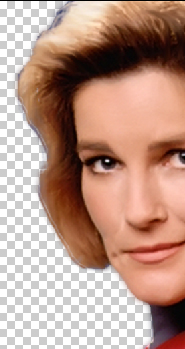
On my new layer, I painted the strands on in the darker tone for underhair.
When I was happy with the position, I duplicated this layer, then set the blend mode on the duplicate to be 'screen'. This lightened the duplicate layer for me, but I could also have just stamped the strands in a lighter or mid-tone instead. I then duplicated that 'screened' layer and upped the brightness on the new layer to give me the hair highlights. As a general rule, to make brushed-on hair look natural you should use 3 tones on 3 separate layers - dark, mid-tone, and light - with the dark tone on the bottom-most layer, mid-tone on the middle layer, and light on the topmost layer of your hair layers.
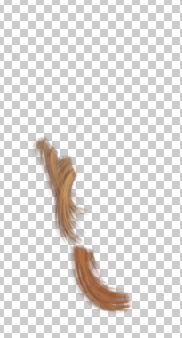
When I was happy with the tone and position, I played with the opacity on the layers a bit until it looked like this:
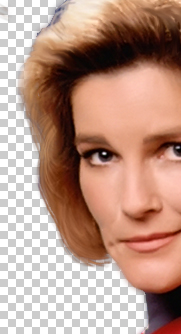
Then I turned on my new patterned background to check it looked okay.
Before: After :
See, that blunt 'cutout' look is all gone. See the completed fiddle HERE :)


